Creating Time Off Plans in Namely Time
This article will explain how to create time off plans in Namely Time. First the accrual rules need to be configured. Accrual rules are the foundation of how leave hours work for the actual accrual banks. Once a rule is in place, it needs be assigned to an accrual bank in Namely Time. Accrual banks are used when an employee requests time off in Namely Time. Accrual banks are then assigned to an individual employee or the employee role. Examples of accruals banks are: PTO, Sick, and bereavement.
OVERVIEW
Accrual rules and accrual banks are needed in order for employees to be able to request time off in Namely Time. First an accrual rule must be created. Accrual rules are the frequency and amount an employee will be able to utilize. Once a rule is in place, it must be assigned to an accrual bank. Accrual banks are then assigned to an individual employee or the employee role (preferred method).
SETTING UP ACCRUAL RULES
-
Click Accrual Rules in the Configuration section.
-
Click Add.
-
Enter a Rule ID and Description, specify whether the rule will be Active, and select whether the new rule will be based on an existing rule.
-
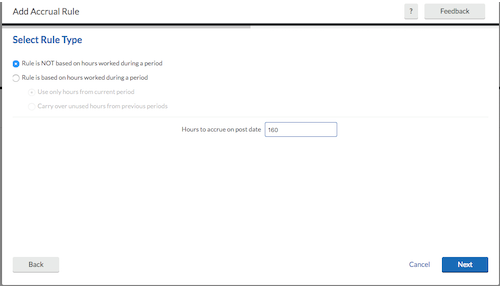
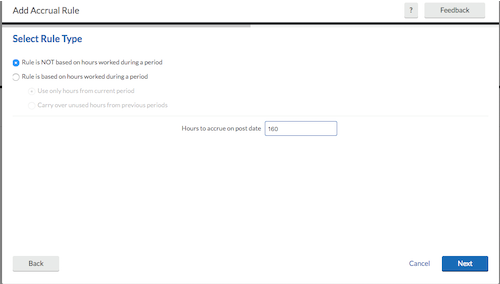
Click Next. Select Rule is NOT based on hours worked during a period.

-
Select the amount the accrual rule will post in the Hours to accrue on post date field.
-
Click Next.
-
Select when you would like the accrual rule to post. You may post accruals at certain intervals (such as weekly bi-weekly) as well as monthly or yearly on specific dates.
-
If necessary, select Accruals begin posting, and specify a span and unit of time-based on the hire date. If left unchecked, then accruals will begin posting immediately.
-
If necessary, select Accruals stop posting, and specify a span and unit of time-based on the hire date. If left unchecked, then accruals will post indefinitely.
-
If necessary, select Accruals expire after post date, and specify an amount of time. This will expire the accrual.
-
Click Next to view a rule summary. Confirm the information is correct, and click Finish.
Rules that are not based on hours worked during a period
-
Select Rule is NOT based on hours worked during a period. This option is used primarily when employees are awarded their time off hours all at once.

-
Select the amount the accrual rule will post in the Hours to accrue on post date field.
-
Click Next.
-
Select when you would like the accrual rule to post. You may post accruals at certain intervals (such as weekly bi-weekly) as well as monthly or yearly on specific dates.
-
If necessary, select Accruals begin posting, and specify a span and unit of time-based on the hire date. If left unchecked, then accruals will begin posting immediately.
-
If necessary, select Accruals stop posting, and specify a span and unit of time-based on the hire date. If left unchecked, then accruals will post indefinitely.
-
If necessary, select Accruals expire after post date, and specify an amount of time. This will expire the accrual.
-
Click Next to view a rule summary. Confirm the information is correct, and click Finish.
Rules that are based on hours worked during a period
Example: After working at least 30 hours, employees are rewarded 1 hour of PTO.
-
Click Add.
-
Next to Description, enter the hours worked (in this example it is 30).
-
Change the type to:
-
Rule is based on hours worked during a period.
-
Select Carry over unused hours from previous periods.
-
-
Enter the Process for every hours (in this example it is 30).
-
Enter the Hours to accrue on post date (in this example it is 1.0000). Then click Next.
-
Choose All job codes, all clockable job codes, or only selected job codes. This will dictate which job code would reduce the applicable time off balance. Click Next.
-
Counted hours are options are chosen by default. They will either be Regular, Overtime 1, or Overtime 2. Click Next.
-
If necessary, select Accruals begin posting, and specify a span and unit of time based on the hire date. If left unchecked, then accruals will begin posting immediately.
-
If necessary, select Accruals stop posting and specify a span and unit of time-based on the hire date. If left unchecked, then accruals will post indefinitely.
-
If necessary, select Accruals expire after post date and specify an amount of time. This will expire the accrual.
-
Click Next and Finish.
Once the accrual rule is set, it must be assigned to an accrual bank.
SETTING UP ACCRUAL BANKS
-
Go to Configuration > Accruals > Accrual Banks.
-
Click Add.

-
Enter Vacation under Description.
-
You only need to create one bank for each accrual type. As long as the accrual rules apply to vacation, sick leave, or PTO, and hey do not contradict each other, they can remain in the same bank.
-
-
Click Next.
-
Click Assign, choose all relevant accrual rules, and click Assign again.
-
Click Next.
-
Click Assign, choose the job code it will be applied to (a leave code such as Vacation or Sick Leave) and click Assign again.
-
Click Assign.
ASSIGNING ACCRUAL BANKS
-
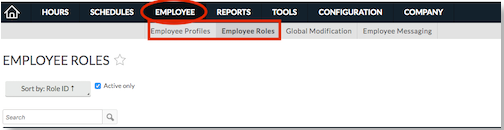
Go to Employee > Employee Roles or Employee Profile.
-
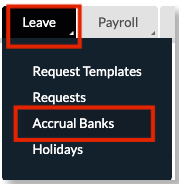
Click on an employee role or profile > Leave > Accrual Banks branch.
-
Click Assign, select the Vacation bank, and click Assign again.
-
Click Save.
ADJUSTING ACCRUAL BANK BALANCES
-
In Namely Time, click Employee > Employee Profile.
-
Select your employee from the left panel.
-
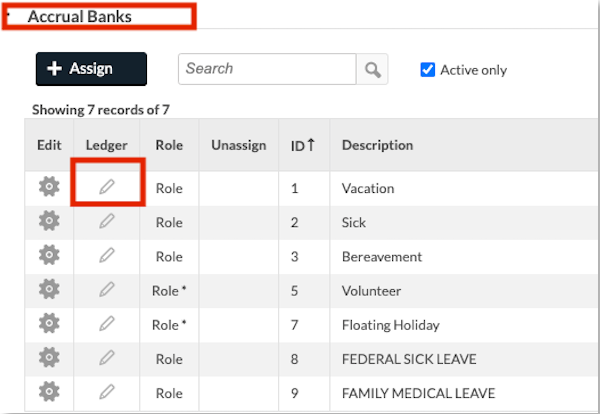
Within the employee profile, click the Leave tab > Accrual Banks at the top.
-
Scroll down and click the Pencil icon under Ledger to edit the accrual bank.
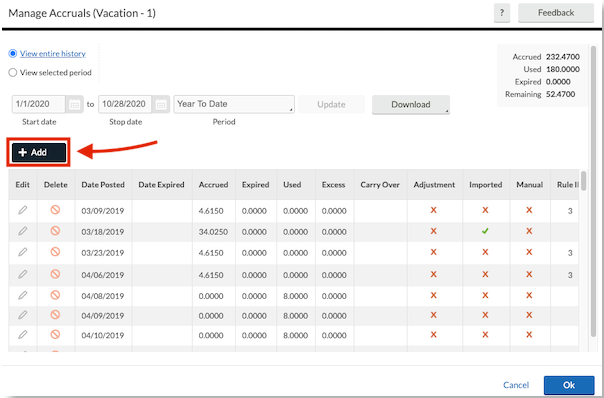
-
The Manage Accruals window will automatically pop out. Click
 .
.
-
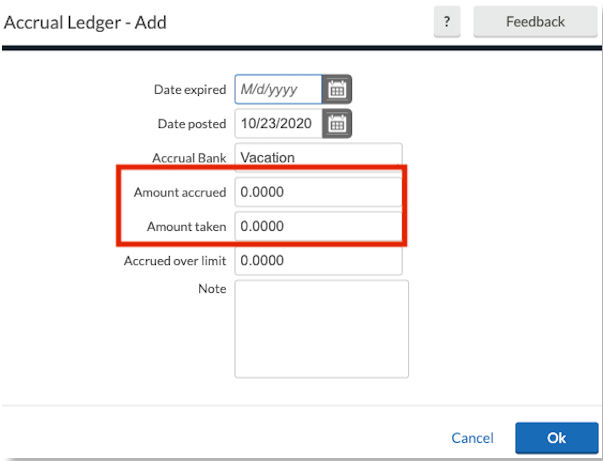
The Accrual Ledger window will pop out.
-
Amount Accrued: Adding the time you entered from the remaining balance of the employee's current Accrual.
-
Amount Taken: Subtracting the time you entered from the remaining balance of the employee's current Accrual.
-
Date Posted: Enter the date you want the Amount Accrued or Amount Taken to be reflected in the Ledger.
-
-
Click Ok once you have made your changes to the Accrual Ledger.
-
Click Ok in the Manage Accruals window > Save in the employee's profile.